Showing posts with label sewing. Show all posts

Friday, March 18, 2011

How To Shorten Curtains

As requested by a fan here are some instruction on how to take up curtains. It really is very simple and is a case of common sense. Really just take a look at how the curtains are constructed as you alter them and copy .

1. Shortening curtains all depends on a) how much is being taken up b) what type of header you have c) do you have a lining? Is that lining attached at the bottom or is it just attached down the sides and simply hemmed and shorter than the decorative face fabric.

2. If you are only taking them up a bit, then you could just create a big turn up and not have to actually cut off any excess. Very easy especially if you don’t have a lining. It maybe easier and simpler to adjust the top of the curtain rather than the bottom but this depends on the header i.e. Tab Top, Eyelet or Pencil Pleat Tape. You can move the Tape down by unpicking the tape, the top of the curtain and a little down the sides. Mark where the new tape will be positioned then fold the top of the curtain a ¼ inch above where the tape will sit and fold in the sides too. If there is a lot of excess then cut off. Pin the tape back on and sew into position. Gather as needed and reattach the drapery hooks.


3. If your header is an eyelet one or tab top then you will have to adjust the hemline. First hang the curtains up on the curtain pole they will occupy.


4. Decide on where you want the hemline to fall by sticking a couple of pins in to mark the length. Take the curtains down.



DSC02998


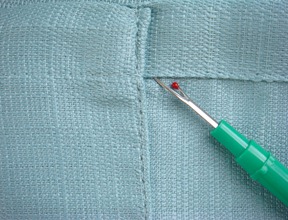
5. If you have a lining you will have to unpick this now from the decorative fabric. Use a seam ripper or some pointed embroidery scissors. Unpick along the bottom and up the sides to where your new hemline will be too allow the fabrics to be folded over.


DSC02995


6. Laying the curtains flat over a flat hard surface, you will need to mark a line across the width of the curtain where you have placed the pin for your new hemline. Measure down from the top of the curtains to the pin, mark with chalk or another fabric marker, do this measurement every 10 inches across. Then draw a line to connect all these marks.


DSC02996


7. Measure another 2-3 inches (the longer the curtain the bigger number you will use) from this line and mark, again do this across the width of the curtain and draw a line.

8. Cut off the excess now by cutting along this new line.

9. The lining is always shorter than the decorative fabric so you can cut off an inch more than the decorative fabric.


DSC03000


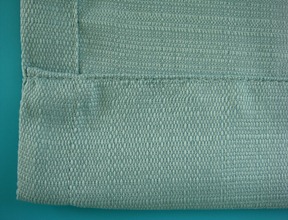
10. Now fold the raw edge of the fabric (decorative) over ½ inch and press. Then fold over again at the point where the new hemline will be and press again. Do the same for the Lining.


DSC03002


11. Now depending on how the lining was attached at the bottom you will either have the decorative fabric hemline folding over the lining and encompassing it fully, pin it in place and sew along the hem (topstitch). Or you will sew the hemline of the decorative fabric and separately sew the hemline of the lining. The lining then can be stitched to the side of the decorative fabric at the bottom with a few hand stitches.


12. You should be done now so re-hang your curtains.

Friday, March 11, 2011

March Recommended Reading

Cath Kidston: SEW

I bought this book last year when I was looking for inspiration in my down time. This British designer’s style is very recognisable and evokes images of chintzy housewife. This book has many projects, some which are suitable for beginners and some for those a bit more advanced. At the beginning of the book it actually has a section on the basics of sewing, such as how a sewing machine works, how to draft patterns and basic tools.

She also goes into detail about how to make different types of seams and different methods of decorating pieces such as appliqué. It is a very easy book to follow and great for a beginner especially since it come with the patterns and a ready to make bag, which are in a flap on the inside cover. For those who are already advance, you already know how to make many of these, but it is still great for getting ideas.

Projects include; shopper bags, baby mobile, tablecloths, wash bags, a beanbag, child’s apron, and a quilted purse.

My Rating: 7/10


Colette Wolff: The Art of Manipulating Fabric

I bought this book whilst doing my degree at university. I was looking for ideas for surface decoration to incorporate with my screen printing. It is a jam packed book full of what seems like hundreds of ways to stitch, fold and press fabric into pieces of sculpture.

The photos are all black and white and the fabric used to teach you the methods is just plain white so you don’t get distracted by colours and patterns. The instructions are easy to follow, but note this is really a book I think for the more advanced seamstresses, as this is something you tend to use once you know the basics and you then incorporate in your pieces.

You could spend days trying out the methods, I haven't even tried most of them and I've had the book for years. It's one of those books you just have for reference and inspiration and you will have it forever!

Surface decoration methods included; pleating, ruffles, tucks, shirring, Suffolk puffs, and quilting.

My Rating: 9/10

Sunday, February 20, 2011

Recommended Reading

I was thinking I would post some books that I recently got that i've found very inspiring. The first is the Quilting Bible.

As a Brit I wanted to learn how to make a traditional American Quilt. I found the whole book full of useful step by step guides and inspiring projects. Even if you know how to quilt having this on your bookshelf will always be useful. I always still collect how to sew books just because they are always good as reference and no matter how many years you've been sewing.

Link to the book:
Quilting Bible


My American - British Quilt being made.


My husband got me this for Christmas. Lotta Jansdotters's Simple Living. Its a wonderful book if you are a sewing beginner or if you're a lover of functional, pragmatic Scandinavian design and you want to get some inspiration. Lotta Jansdotter also has lots of other books and she has a website http://www.jansdotter.com
I left most of my books back home, so I would welcome any suggestions for interesting books to look out for here, so as to build up my new collection.


Friday, February 11, 2011

How to get some comfort in your life...

A Simple Cushion


1. Decide on what size and shape you want. I am making a 40cm x 40cm. Firstly I cut out the material. If you have a patterned fabric place your square pattern (43cm x 43cm, this includes the seam allowance) in such a way that it centres and frames a particular part of the patterned fabric. If you have a picture fabric like I’m using make sure you insert the zip at the bottom of the picture.


2. With the right sides of the fabric together pin the bottom of the fabric 3cm from the side of the square. Sew just 3cm. See picture.


3. Press the seam open. You can see in the picture the 3cm sew line coming in from each side of the square. I like to zigzag stitch the edges of the pressed opened seam or use pinking shears.


4. Insert the zip by pinning it at the one end first (the closed end), then pin down one side , pin the other end in and then down the other side.


5. Clip on your zipper foot for the sewing machine and start sewing midway down one side. Make sure the zipper pull is a quarter of the way along the zip, as you get to it as you’re sewing stop, make sure the needle is in the fabric, lift the foot up and pull the zipper pull past the foot. It can be a squeeze sometimes but just give it a wiggle. Then foot down and continue.


6. Once you get to the end, leave the needle in, foot up and turn at a 90 degree angle. Foot back down and sew across the bottom of the zip. I sew back and forth a couple of times to make it extra strong and secure. Lift foot again and turn again and sew down the other side, repeat as the other side and end.


7. Once done, keep the right sides of the fabric together and pin the edges of the square together.


8. Sew 1.5cm from the edge along all 3 three sides.


9. I like to tidy up the edges by using a zigzag stitch and cutting off any excess. You can use pinking shears if you wish.


10. You’re finished, so turn it right side out and insert a cushion pad.


The finished product! Enjoy!