Showing posts with label How to. Show all posts

Friday, March 18, 2011

How To Shorten Curtains

As requested by a fan here are some instruction on how to take up curtains. It really is very simple and is a case of common sense. Really just take a look at how the curtains are constructed as you alter them and copy .

1. Shortening curtains all depends on a) how much is being taken up b) what type of header you have c) do you have a lining? Is that lining attached at the bottom or is it just attached down the sides and simply hemmed and shorter than the decorative face fabric.

2. If you are only taking them up a bit, then you could just create a big turn up and not have to actually cut off any excess. Very easy especially if you don’t have a lining. It maybe easier and simpler to adjust the top of the curtain rather than the bottom but this depends on the header i.e. Tab Top, Eyelet or Pencil Pleat Tape. You can move the Tape down by unpicking the tape, the top of the curtain and a little down the sides. Mark where the new tape will be positioned then fold the top of the curtain a ¼ inch above where the tape will sit and fold in the sides too. If there is a lot of excess then cut off. Pin the tape back on and sew into position. Gather as needed and reattach the drapery hooks.


3. If your header is an eyelet one or tab top then you will have to adjust the hemline. First hang the curtains up on the curtain pole they will occupy.


4. Decide on where you want the hemline to fall by sticking a couple of pins in to mark the length. Take the curtains down.



DSC02998


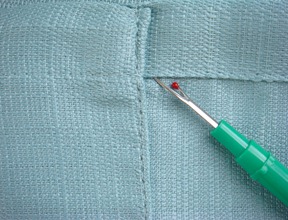
5. If you have a lining you will have to unpick this now from the decorative fabric. Use a seam ripper or some pointed embroidery scissors. Unpick along the bottom and up the sides to where your new hemline will be too allow the fabrics to be folded over.


DSC02995


6. Laying the curtains flat over a flat hard surface, you will need to mark a line across the width of the curtain where you have placed the pin for your new hemline. Measure down from the top of the curtains to the pin, mark with chalk or another fabric marker, do this measurement every 10 inches across. Then draw a line to connect all these marks.


DSC02996


7. Measure another 2-3 inches (the longer the curtain the bigger number you will use) from this line and mark, again do this across the width of the curtain and draw a line.

8. Cut off the excess now by cutting along this new line.

9. The lining is always shorter than the decorative fabric so you can cut off an inch more than the decorative fabric.


DSC03000


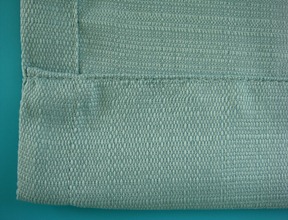
10. Now fold the raw edge of the fabric (decorative) over ½ inch and press. Then fold over again at the point where the new hemline will be and press again. Do the same for the Lining.


DSC03002


11. Now depending on how the lining was attached at the bottom you will either have the decorative fabric hemline folding over the lining and encompassing it fully, pin it in place and sew along the hem (topstitch). Or you will sew the hemline of the decorative fabric and separately sew the hemline of the lining. The lining then can be stitched to the side of the decorative fabric at the bottom with a few hand stitches.


12. You should be done now so re-hang your curtains.

Tuesday, March 1, 2011

How to make a Flat Bottom Pouch

1. Cut out fabric in a trapezium shape. Depending what size pouch you want, you will scale up or down accordingly. But as an example; the top of the Trapezium is 20cm, the bottom of the Trapezium is 28cm, the height is 20cm. When marking out draw your bottom line first then find halfway along that, so 14cm, draw a 20 cm line going up from that point. You will need to then draw a line parallel to the bottom one going 10cm either side of the 20cm height line.
Using these measurements cut 2 patterned fabric pieces and 2 plain cotton pieces. If you want to include a wrist strap then cut a 4cm wide, 25cm long strip of patterned fabric. I am making a different type of wrist strap in the picture, so don't cut in two. You will need a 18cm zip.


2. Lay the plain cotton piece down with the right side facing up and lay the zip along the top edge of it leaving an equal gap each side of where the actual zip ends.


3. Now lay the patterned fabric piece right side down on top of the zip and the plain cotton piece. Make sure the sides match up. Pin together these 3 pieces . You can feel the zip line through the fabric so you will be able to know where to pin. Sew.


4. When you pull the wrong side of the fabrics together, you will see that the zip is sandwiched between the materials and you can’t see the edge of the zip material.

Repeat steps 2 and 3 again for the other side.


You should then have it look like this, I call it a butterfly.


5. Now bring the right sides of the patterned fabric and the plain fabric together. Pin 1 cm from the edges. If you are including a wrist strap this is when you will sew it in. Also make sure the zipper pull is half way open so you can pull the pouch right side out at the end.

(For the wrist strap fold the strip of fabric you cut for it length ways, right sides together and press. Sew down the raw edge side, about 5mm from the edge. When you get to the end don’t cut your thread, instead pull the piece out until you have the same length of thread as the strap. Cut. Get a long needle and thread the cut end and use the long needle as a guide pull the thread through the tube you now have. Keep pulling the thread and then the tube will naturally turn itself the right way out.) Bring the two ends of the strap together and put the loop inside the bag between the right sides of the patterned fabric, the ends will poke out but lie in the path of the seam you are about to sew for the sides. Sew. Leave a 9cm gap at the bottom of the plain cotton end.

I then use pinking shears to tidy up the edges and get rid of excess, it also helps with the next.


6. Now squeeze one hand through that gap you left and get your fingers into the corners of the patterned fabric. You need to pinch together the two seams of the side and the bottom, from the outside you are looking to get a triangle shape. The seams at the bottom and the sides look like they’re making a T shape. Pin across 4cm from the point of the corner.


You need to do this for all the corners of the patterned fabric and the plain fabric. Sew.


7. I use pinking shears to cut off the excess. Now put your hand in the gap again, and pull the piece the right side out. Get your fingers poking into all the corners to make them all pointy. You will also need to sew up the gap by either slip stitching by hand or machine stitching the edges together. Push the lining back into the bag and again poke your fingers in the corners.

And there you have it. A flat bottom. As I said you can make varying sizes, just think about your scaling. Also the stiffer the fabric the more it will stand upright on its own as well.


Sunday, July 4, 2010

How to Look Like a Domestic Goddess!

There are a couple of fabrics I purchased recently that I didn't quite know what to do with. The motifs on them were large and not necessarily appropriate for making into cushions or bags. They were food themed fabrics, that were quite tough wearing. So I decided to combine them with my other love, cooking. The number of times I've baked or cooked something messy and it ends up mostly on my clothes (and I always seem to be wearing white when this happens, when will I learn), inspired me to make an apron.

So I will show you how I made myself a very pretty simple apron with a handy front pocket.


1. I made up my pattern from an old apron of my mums, pinned it on my fabric and cut out.


2. Unfold the cut out piece. Now you must hem the edges. Fold the edge over 0.5cm then turn over again 1cm and pin in place. I like to make sure the edges are symmetrical, so the sides are done first. then the top and bottom of the apron. Sew.


3. When you had cut out the fabric at the beginning, there would of been two scooped out pieces where the arm holes were. Re-use these for the apron pocket by joining them together at the straight edge and then level the bottom as you don't want a pointy bottom pocket.


4. I like to use some really bright bias to edge the top of the pocket. Before that overlock or zig-zag the edge of the pocket.


5. Turn under the overlocked edge and pin the pocket to the front of the apron just below the line of where you will put the apron ties. Sew


6. Now to attach the apron ties. Take some twill tape 1" wide, measure up how much you will need to get over your head comfortably. Double turn over the ends and pin to both sides of the neckline. Sew a square with diagonals through it like we did for the bag but slightly smaller. Measure up how much twill tape you will need to tie around yourself. Double turn over the ends and sew. Cut the length in half, then double turn over the ends and pin to the waistline edge. Sew a square with diagonals again.


7. So there we have the end result. I have also used PVC to make easy clean aprons for the kids. Useful for when they are cooking or painting.


Wednesday, June 30, 2010

How I Made a New Bag!

1. Cut out two pieces of the printed fabric 45cm x 40cm and the same measurements in the cotton lining.

2. Pin at the top, the right sides together of the printed fabric and the cotton lining and sew. Sew 1.5cm from the edge of the fabric.

3. Unfold and you will now have one whole piece, do the same for the other cut out pieces of printed and cotton fabric.


4. Pin the right sides together, with the printed fabrics together and the cotton lining together,make sure the two joins also match up as well. Sew along the sides, the top (the top is the printed fabric end) and down the other side as well.


Along the bottom edge (the cotton lining end) sew 3cm from the edge of the fabric, in from both sides. Don't sew all the way across,
you must leave a 14cm gap in the middle so you can pull the bag the right side out after sewing.


5. Pull the bag right side out through the gap you left, and then push the cotton lining down into the inside of the printed section of the bag.


6. The outer printed fabric should come over the top and into the inside by about 1cm. Press to
give a sharp edge. Then make sure the lining is pushed up against the inside and is smooth and taut.


7. Turn the whole bag inside out, so you can get to the bottom of the lining. Slip stitch the cap
with white thread. Then turn back the right way out again. Now for the handles.


8. Take 110cm of Twill Tape, cut in half. Take one half and fold over one end and pin to the inside top of the bag, a little way from the side of the bag. Do the same for the other end on the same side. Sew a rectangle and then sew diagonally through the rectangle. This will give the handle strength. Do the same to the other side with the other half of the tape.


9. The finished Bag! Hopefully that was explain well, it's difficult to actually explain step by step when you just do it automatically with out really thinking. These instructions are for a 42cm x 37cm shopper bag. Enjoy!