Showing posts with label step by step. Show all posts

Sunday, July 4, 2010

How to Look Like a Domestic Goddess!

There are a couple of fabrics I purchased recently that I didn't quite know what to do with. The motifs on them were large and not necessarily appropriate for making into cushions or bags. They were food themed fabrics, that were quite tough wearing. So I decided to combine them with my other love, cooking. The number of times I've baked or cooked something messy and it ends up mostly on my clothes (and I always seem to be wearing white when this happens, when will I learn), inspired me to make an apron.

So I will show you how I made myself a very pretty simple apron with a handy front pocket.


1. I made up my pattern from an old apron of my mums, pinned it on my fabric and cut out.


2. Unfold the cut out piece. Now you must hem the edges. Fold the edge over 0.5cm then turn over again 1cm and pin in place. I like to make sure the edges are symmetrical, so the sides are done first. then the top and bottom of the apron. Sew.
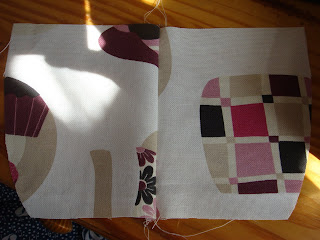


3. When you had cut out the fabric at the beginning, there would of been two scooped out pieces where the arm holes were. Re-use these for the apron pocket by joining them together at the straight edge and then level the bottom as you don't want a pointy bottom pocket.


4. I like to use some really bright bias to edge the top of the pocket. Before that overlock or zig-zag the edge of the pocket.


5. Turn under the overlocked edge and pin the pocket to the front of the apron just below the line of where you will put the apron ties. Sew


6. Now to attach the apron ties. Take some twill tape 1" wide, measure up how much you will need to get over your head comfortably. Double turn over the ends and pin to both sides of the neckline. Sew a square with diagonals through it like we did for the bag but slightly smaller. Measure up how much twill tape you will need to tie around yourself. Double turn over the ends and sew. Cut the length in half, then double turn over the ends and pin to the waistline edge. Sew a square with diagonals again.


7. So there we have the end result. I have also used PVC to make easy clean aprons for the kids. Useful for when they are cooking or painting.


Wednesday, June 30, 2010

How I Made a New Bag!

1. Cut out two pieces of the printed fabric 45cm x 40cm and the same measurements in the cotton lining.

2. Pin at the top, the right sides together of the printed fabric and the cotton lining and sew. Sew 1.5cm from the edge of the fabric.

3. Unfold and you will now have one whole piece, do the same for the other cut out pieces of printed and cotton fabric.


4. Pin the right sides together, with the printed fabrics together and the cotton lining together,make sure the two joins also match up as well. Sew along the sides, the top (the top is the printed fabric end) and down the other side as well.


Along the bottom edge (the cotton lining end) sew 3cm from the edge of the fabric, in from both sides. Don't sew all the way across,
you must leave a 14cm gap in the middle so you can pull the bag the right side out after sewing.


5. Pull the bag right side out through the gap you left, and then push the cotton lining down into the inside of the printed section of the bag.


6. The outer printed fabric should come over the top and into the inside by about 1cm. Press to
give a sharp edge. Then make sure the lining is pushed up against the inside and is smooth and taut.


7. Turn the whole bag inside out, so you can get to the bottom of the lining. Slip stitch the cap
with white thread. Then turn back the right way out again. Now for the handles.


8. Take 110cm of Twill Tape, cut in half. Take one half and fold over one end and pin to the inside top of the bag, a little way from the side of the bag. Do the same for the other end on the same side. Sew a rectangle and then sew diagonally through the rectangle. This will give the handle strength. Do the same to the other side with the other half of the tape.


9. The finished Bag! Hopefully that was explain well, it's difficult to actually explain step by step when you just do it automatically with out really thinking. These instructions are for a 42cm x 37cm shopper bag. Enjoy!